Client-side JavaScript library
Custom integrations are a paid add-on
Implementing tracking with our client-side JavaScript library requires a custom integration, starting at €2,500. Please contact us at support@tracify.ai for integration support.
Our client-side JavaScript library lets you send customer events to Tracify from the browser. It is consent-aware: the tracking script is always loaded on the page and automatically adjusts what it collects based on whether the visitor has consented to tracking.
- Without consent, Tracify collects limited data using privacy-safe methods.
- With consent, Tracify unlocks richer capabilities - cookies and local storage, client-side fingerprinting, and the click IDs and user data needed for conversion postback - all of which improve attribution accuracy.
Unlike most tracking tools, which must be blocked entirely until consent is given, Tracify's script can load for every visitor. It captures basic analytics from all visitors while unlocking full tracking capabilities for those who consent.
Getting Started
Each step is outlined in detail below.
- Install the Tracify smart snippet on all pages that you wish to track.
- Connect your consent management platform so Tracify knows each visitor's consent status. See Using a Consent Management Platform with Tracify.
- Configure individual tracking events.
- During this step you'll determine which events (actions) you would like to track (e.g. page views, purchase events).
- You may speak with your Account Manager to determine which events are appropriate for your business.
- Verify events are sent in your developer console.
- Confirm events arrive correctly in your Recent Activity dashboard. It may take up to 5 minutes for events to appear. You may also speak with your Account Manager if you need help.
Installation
Follow these steps to install Tracify for the first time. The recommended path is first-party tracking, because it gives you the most accurate and reliable browser-side tracking.
1. Configure first-party tracking
Before adding the snippet to your site, configure first-party tracking in your Tracify account. If first-party tracking is not configured yet, you can use the third-party script (see the snippet builder below). We recommend switching to first-party tracking before going live.
2. Get your site ID
Copy your site ID from account settings. Your Account Manager may provide one site ID for testing and another for production, so be sure to use the correct one for your environment.
3. Build your snippet
Use the following snippet builder to generate your tracking code with preferred settings. Use Pretty print if you want to inspect the generated code before copying.
- Select first-party or third-party tracking: For first-party tracking, enter only the domain you configured; the builder adds
script.automatically. - Choose fingerprinting behavior: Choice between
always enabledandonly with consent. Client-side fingerprinting improves visitor matching and results in better tracking accuracy. Use of client-side fingerprinting may require user consent, depending on your local regulations. - Verify Script URL: Use the verify script button to check whether the generated script URL can load as a JavaScript file from your browser, for example
https://script.yourdomain.com/js/api.v2.js. If the check fails, confirm the domain is typed correctly and first-party tracking is configured before going live.
By default, the generated code also includes tracify.capturePageView(); so the page view is sent after the smart snippet is installed.
4. Install the snippet
Paste the generated snippet within the <head></head> tags of your website on all pages you wish to track.
The smart snippet sets up the Tracify configuration and loads the SDK. Because it installs a command queue, you can call any tracify.* method anywhere on the page, even before the SDK has finished loading; queued calls run automatically as soon as it is ready.
Migrating from the v1 snippet?
Earlier versions of this library used a snippet that looked like the following.
<script type="text/javascript" src="https://script.yourdomain.com/api.v1.js"></script>
<script type="text/javascript">
  var tracify = Tracify({ csid: "00000000-0000-000-0000-000000000000", fingerPrint: true });
  tracify.capturePageView();
</script>
tracify.capturePageView(), tracify.capturePurchase({...}), etc.) stay exactly the same. Note, the v1 snippet does not support consent management.
Consent management
Use tracify.setConsent() to inform Tracify of the visitor's consent status. This can be called at any time - on page load if consent has already been granted, or later when the visitor interacts with your consent banner.
Parameters:
| Parameter | Type | Required | Description |
|---|---|---|---|
hasConsent |
boolean | Yes | true if the user has consented, false if declined or revoked. |
consentId |
string | No | An optional identifier for the consent record (e.g. from your CMP). |
Examples:
// User has consented to tracking
tracify.setConsent(true);

// User has consented, with a consent ID from your CMP
tracify.setConsent(true, "consent-abc-123");

// User has declined or revoked consent
tracify.setConsent(false);
When consent is set to true, Tracify will:
- Set cookies and local storage for cross-session identification
- Enable client-side fingerprinting if it is not already enabled
- Capture click IDs and user data needed for conversion postback
When consent is set to false, Tracify reverts to limited, privacy-safe tracking.
Tip
setConsent() emits a consent event that carries the full tracking information (fingerprint, identifiers, etc.) on its own. You therefore only need to call capturePageView() once per page load - you do not need to re-capture events after consent is granted.
For CMP setup patterns and copy-paste examples, see Using a Consent Management Platform with Tracify.
Set up Events
The installation steps above load the Tracify client-side library. Event calls are what send activity to Tracify. Start with a page view, then add the event functions that match the actions you want to track.
Recommended E-Commerce Events
- Page View: Track each time a customer lands on a page.
- Product View: Track each time a customer views a product page.
- Add to Cart: Track each time a customer adds an item to their cart.
- Purchase: Track each time a customer makes a purchase.
Recommended Leadgen Events
- Page View: Track each time a customer lands on a page.
- Conversion Event: Track when a customer completes your conversion action (email signup / download, etc.)
Supported Events
| Event | Convenience Function | Required Arguments | Optional Arguments |
|---|---|---|---|
| Page View | capturePageView() |
None | None |
| Product View | captureProductView() |
None | None |
| Add to Cart | captureAddToCart() |
None | None |
| Purchase | capturePurchase() |
amount, orderId, currency, orderIdIsSensitive |
isReturningCustomer, discountCodes, conversionMetadata |
| General Conversion (Leadgen) | captureConversion() |
value, conversionId, currency, conversionIdIsSensitive |
isReturningCustomer, conversionMetadata |
Page View Event
Track when a customer lands on a page. If you left Include page view call enabled in the builder, this call is already included in your generated code.
Product View Event (Ecom)
Track when a customer views a product page. Generally triggered on product description pages (PDP).
Add to Cart Event (Ecom)
Track when a customer adds items to their cart.
Purchase Event (Ecom)
Important
Server-side purchase and conversion events
If your purchases or conversions are processed on your server rather than in the browser, use the Server-side Events API to send those events instead of this library. You will need to ensure your server-side events include identifiers that overlap with the browser-side browsing events. See Identifier Consistency Across Events for details.
Track when a customer completes a purchase. This event is used by Tracify to track your return on ad spend (ROAS).
Required Parameters:
- amount: The amount of the purchase.
- orderId: A unique identifier which Tracify uses to make sure the same order is only counted once. Send the same order ID to update an order (e.g. adjust amount down due to cancellation).
- currency: The currency used to make the purchase. Please use the appropriate 3-letter
ISO-4217 code.
- It is your responsibility to ensure you're sending the correct currency code for a given order.
- orderIdIsSensitive:
- Set
trueto anonymize order IDs containing personal info (e.g., email). - Set
falsefor non-sensitive IDs such as numerical or timestamp-based IDs.
- Set
Optional Parameters:
- isReturningCustomer: Indicate whether the customer is returning. Set to
truefor returning customers andfalsefor new customers. This value is used to synchronize historical data from your system about new versus returning customers with Tracify. - discountCodes: One or more discount codes used for the purchase sent as an array. Example:
['SUMMER20', 'FREESHIP'] -
conversionMetadata: An object containing additional information about the conversion. All fields within
conversionMetadataare optional.These fields enable order filtering in your reports. Orders must arrive in Tracify within 24 hours of occurring, but their state often changes afterward (e.g. payment is captured, the order is canceled, or items are returned). Send the purchase event as soon as the order is placed, then call
capturePurchaseagain later with the sameorderIdto update these fields as the order progresses. By using the following statuses you can configure Tracify to include only the order states you care about - for example, include only orders withpaymentStatus: paid, or exclude orders withconversionStatus: canceledorreturned.- conversionChannel: The channel that produced this conversion. Free-form; example values:
web,offline. - conversionStatus: The status of the conversion. Must be one of:
open,delivered,canceled,returned. - paymentSource: The service used to process the payment. Free-form; example values:
PayPal,Apple Pay,credit card. - paymentStatus: The status of the payment. Free-form; example values:
open,paid,authorized. - conversionTags: Custom tags associated with the conversion sent as an array of strings. Example:
['sale', 'holiday'].
- conversionChannel: The channel that produced this conversion. Free-form; example values:
tracify.capturePurchase({
  amount: "21.11",
  orderId: "0123456789",
  currency: "EUR",
  isReturningCustomer: false,
  orderIdIsSensitive: false,
  discountCodes: ["SUMMER20", "FREESHIP"],
  conversionMetadata: {
    conversionChannel: "web",
    conversionStatus: "delivered",
    paymentSource: "credit card",
    paymentStatus: "paid",
    conversionTags: ["sale"],
  },
});
General Conversion Event (Leadgen)
Important
Server-side purchase and conversion events
If your purchases or conversions are processed on your server rather than in the browser, use the Server-side Events API to send those events instead of this library. You will need to ensure your server-side events include identifiers that overlap with the browser-side browsing events. See Identifier Consistency Across Events for details.
Track conversions other than purchases (leads, downloads). Trigger this event when a customer completes your desired action. Tracify supports a single conversion per customer journey: a journey can contain either one general conversion or one purchase - never both, and never more than one of either. (Resending an event with its original ID to update it does not count as an additional conversion.)
Required Parameters:
- value: Used to calculate your ROI on advertising spend. Set it to a value that matches the type of conversion you are tracking (lead value, download value etc.). This value may be 0.
- conversionId: A unique identifier which Tracify uses to make sure the same conversion is only counted once.
- currency: The currency you use to calculate ROI. Please use the appropriate 3-letter
ISO-4217 code.
- It is your responsibility to ensure you're sending the correct currency code for a given order.
- conversionIdIsSensitive:
- Set
trueto anonymize conversion IDs containing personal info (e.g., email). - Set
falsefor non-sensitive IDs such as numerical or timestamp-based IDs.
- Set
Optional Parameters:
- isReturningCustomer: Indicate whether the lead is returning. Set to
truefor returning leads andfalsefor new leads. This value is used to synchronize historical data from your system about new versus returning leads with Tracify. -
conversionMetadata: An object containing additional information about the conversion. All fields within
conversionMetadataare optional.These fields enable conversion filtering in your reports. Conversions must arrive in Tracify within 24 hours of occurring, but their state often changes afterward (e.g. a lead is qualified, payment is captured, or the conversion is canceled). Send the conversion event as soon as it occurs, then call
captureConversionagain later with the sameconversionIdto update these fields as the conversion progresses. By using the following statuses you can configure Tracify to include only the conversion states you care about - for example, include only conversions withpaymentStatus: paid, or exclude those withconversionStatus: canceled.- conversionChannel: The channel that produced this conversion. Free-form; example values:
web,offline. - conversionStatus: The status of the conversion. Must be one of:
open,delivered,canceled,returned. - paymentSource: The service used to process the payment. Free-form; example values:
PayPal,Apple Pay,credit card. - paymentStatus: The status of the payment. Free-form; example values:
open,paid,authorized. - conversionTags: Custom tags associated with the conversion sent as an array of strings. Example:
['lead', 'newsletter'].
- conversionChannel: The channel that produced this conversion. Free-form; example values:
Example leadgen conversion:
tracify.captureConversion({
  value: "24.11",
  conversionId: "abc123xyz789",
  currency: "EUR",
  isReturningCustomer: false,
  conversionIdIsSensitive: false,
  conversionMetadata: {
    conversionChannel: "web",
    conversionStatus: "delivered",
    paymentSource: "credit card",
    paymentStatus: "paid",
    conversionTags: ["lead"],
  },
});
Verifying Events
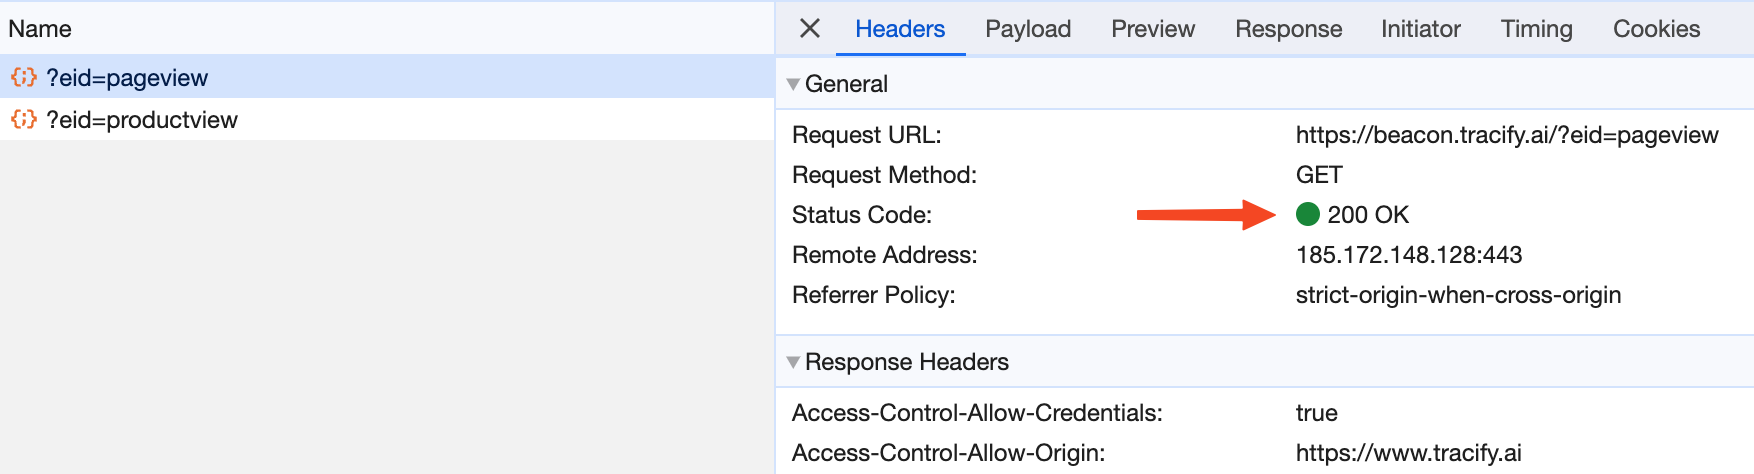
The easiest way to determine if events are sending properly is open Developer Tools in your browser and visit the Network tab. Make sure that your browser is set to record network activity, and load the page you are troubleshooting. Once the page has loaded, search for the event in question e.g. pageview. You should see a network request for the event along with a status code of 200 OK in the request headers. If you do not see the event, or if the event resolves in an error check your implementation to see if there are any mistakes.
Common Problems
- The incorrect site ID (
csid) is referenced in the smart snippet - see our Installation section. - The function to fire the event is not called - see our Set up Events section.
- Consent is never communicated to Tracify, so consent-gated capabilities stay off - see Using a Consent Management Platform with Tracify.